IronSource LevelPlay
IronSource LevelPlay cocos guide for Custom Adapter GMA SDK.
Prerequisites
Performed by: Developer
App prerequisites
- minSdkVersion of «MIN-ANDROID» (26) or higher
- iOS «MIN-IOS» (18.0) or higher — confirm with your account manager
- An ad unit must already be in place which will be used for targeting
Install the SDK
Performed by: Developer
Install the TapMind LevelPlay extension:
Extension → Extension Manager → Install from File → select the TapMind extension ZIP → Enable.
Pin a tagged release ZIP rather than archive/refs/heads/main.zip.
Configure your app
Performed by: Developer
Add your AdMob app ID to AndroidManifest.xml. Omitting this crashes the app on launch with Missing application ID.
<manifest>
  <application>
    <!-- Sample AdMob app ID: ca-app-pub-3940256099942544~3347511713 -->
    <meta-data
        android:name="com.google.android.gms.ads.APPLICATION_ID"
        android:value="YOUR_ADMOB_APP_ID"/>
  </application>
</manifest>
Replace YOUR_ADMOB_APP_ID with your AdMob app ID from the AdMob web interface. While testing, you may use Google's sample app ID shown above.
Add GADApplicationIdentifier to your app's Info.plist, plus the SKAdNetworkItems array for attribution.
<key>GADApplicationIdentifier</key>
<!-- Sample AdMob app ID: ca-app-pub-3940256099942544~1458002511 -->
<string>YOUR_ADMOB_APP_ID</string>
<key>SKAdNetworkItems</key>
<array>
  <dict>
    <key>SKAdNetworkIdentifier</key>
    <string>cstr6suwn9.skadnetwork</string>
  </dict>
  <!-- Include the full SKAdNetworkItems list (Google + third-party buyer IDs) -->
</array>
Replace YOUR_ADMOB_APP_ID with your AdMob app ID from the AdMob web interface.
Include the complete SKAdNetworkItems list as published by Google — keep this snippet as your single source of truth so it never drifts between pages.
Configure LevelPlay
Performed by: Ad ops
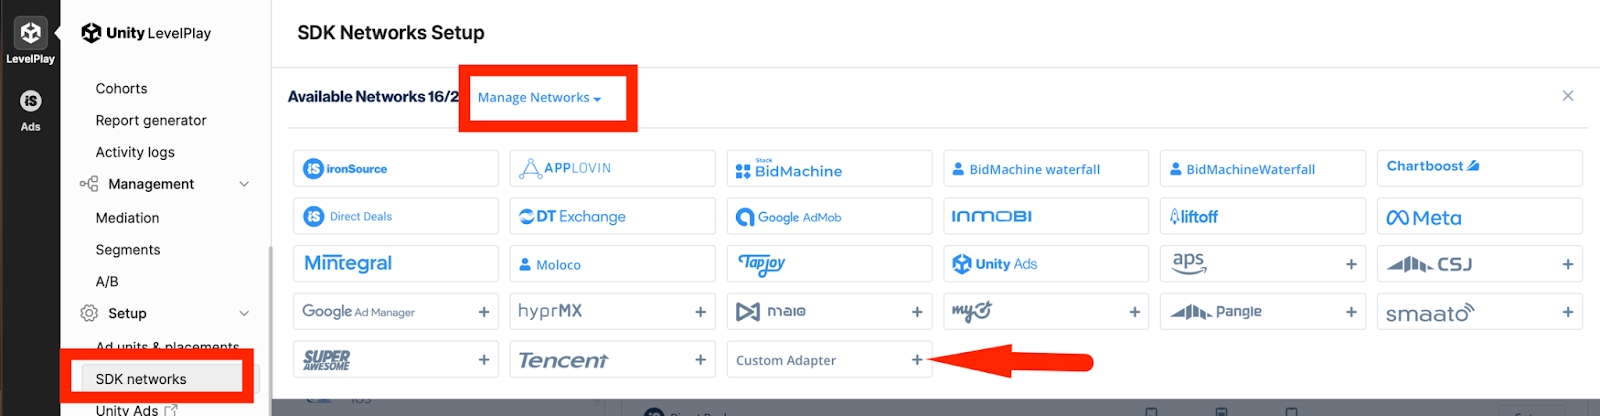
Create the TapMind network: Monetize → Setup → SDK Networks → Available Networks → Manage Networks → select Custom Adapter → enter network key 15c101cb1d → Enter → Save. The network appears as TapMind.
Set up instances: Setup → Instances → select TapMind (Custom) → Add ad instance → select ad type →
Instance Name : provided by your account manager
eCPM / Rate   : provided by your account manager
Note: Enter the rate for each placement — it determines waterfall order. Add one instance per ad format to start.
Verify integration
Performed by: Developer
After install and dashboard configuration:
- Run your app in a debug build. TapMind's test mode is enabled automatically in debug builds and serves test ads at a high fill rate.
- Request an ad through your mediation SDK as you normally would.
- Confirm a TapMind ad fills. Check logs for the tag
TapMindAdapter. - When verified, build in release mode for production — test mode is disabled automatically in release builds, and live ads serve.
Note: Test mode is automatic. It follows your build type: debug = test ads, release = live ads. There is no flag to enable or disable, and nothing to turn off before going live.
Troubleshooting
Performed by: Developer
| Symptom | Likely cause | Fix |
|---|---|---|
| No TapMind ad in production, but works in debug | Wrong/missing class string, or release-build stripping | Verify the class string matches the Class & Network Key Registry exactly; confirm ProGuard keep-rules ship |
| No fill at all | placementName mismatch (case/space) or wrong eCPM position | Re-check placementName exactly; confirm waterfall position |
| App crashes on launch | Missing AdMob app ID in manifest/Info.plist | Add the app-ID meta-data exactly as shown in Configure your app |
| LevelPlay network never appears | Wrong network key | Use the canonical key from the Registry |
For anything else, contact your account manager with the log output and the tag TapMindAdapter.