Unity LevelPlay
Unity LevelPlay Android guide for Custom Adapter GMA SDK.
Prerequisites
Performed by: Developer
App prerequisites
- minSdkVersion of 23 or higher
- compileSdkVersion of 36 or higher
- The Google Mobile Ads (GMA) SDK must be integrated in your app
- An ad unit must already be in place which will be used for targeting
Install the SDK
Performed by: Developer
Ensure your android/build.gradle (project-level) includes the required repositories:
allprojects {
    repositories {
        google()
        mavenCentral()
        maven { url 'https://jitpack.io' }
    }
}
Note: On Gradle 7+, use Gradle Setup (Gradle 7+) instead — declare repositories in settings.gradle under dependencyResolutionManagement and remove the allprojects block. Use one approach, not both.
Open the build.gradle (Module: app) file and add:
dependencies {
    implementation("io.github.tapmind-tech:customadapter-ironsource:2.1.15")
    implementation("com.google.android.gms:play-services-ads:25.0.0")
}
Configure your app
Performed by: Developer
Add your AdMob app ID to AndroidManifest.xml. Omitting this crashes the app on launch with Missing application ID.
<manifest>
  <application>
    <!-- Sample AdMob app ID: ca-app-pub-3940256099942544~3347511713 -->
    <meta-data
        android:name="com.google.android.gms.ads.APPLICATION_ID"
        android:value="YOUR_ADMOB_APP_ID"/>
  </application>
</manifest>
Replace YOUR_ADMOB_APP_ID with your AdMob app ID from the AdMob web interface. While testing, you may use Google's sample app ID shown above.
Configure Unity LevelPlay
Performed by: Ad ops
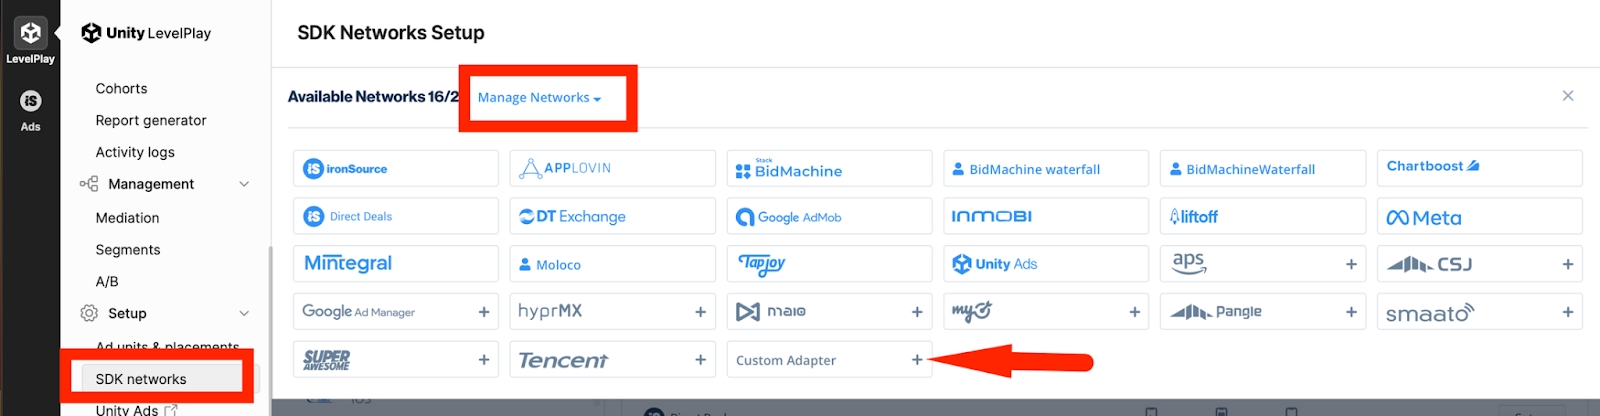
Create the TapMind network: Monetize → Setup → SDK Networks → Available Networks → Manage Networks → select Custom Adapter → enter network key 15c11cb1d → Enter → Save. The network appears as TapMind.
Set up instances: Setup → Instances → select TapMind (Custom) → Add ad instance → select ad type →
Instance Name : provided by your account manager
eCPM / Rate   : provided by your account manager
Note: Enter the rate for each placement — it determines waterfall order. Add one instance per ad format to start.
Verify integration
Performed by: Developer
After install and dashboard configuration:
- Run your app in a debug build. TapMind's test mode is enabled automatically in debug builds and serves test ads at a high fill rate.
- Request an ad through your mediation SDK as you normally would.
- Confirm a TapMind ad fills. Check logs for the tag
TapMindAdapter. - When verified, build in release mode for production — test mode is disabled automatically in release builds, and live ads serve.
Note: Test mode is automatic. It follows your build type: debug = test ads, release = live ads. There is no flag to enable or disable, and nothing to turn off before going live.
Release build QA: There is currently no documented release-safe test path to validate R8/ProGuard without serving live ads. Consumer ProGuard rules from the TapMind AAR are applied automatically when you integrate the published adapter packages.
Troubleshooting
Performed by: Developer
| Symptom | Likely cause | Fix |
|---|---|---|
| No TapMind ad in production, but works in debug | Wrong/missing class string, or release-build stripping | Verify the class string matches the Class & Network Key Registry exactly; TapMind AARs ship consumer ProGuard rules automatically |
| No fill at all | placementName mismatch (case/space) or wrong eCPM position | Re-check placementName exactly against the TapMind Dashboard Placement Name; confirm waterfall position |
| App crashes on launch | Missing AdMob app ID in manifest/Info.plist | Add the app-ID meta-data exactly as shown in Configure your app |
| Unity LevelPlay network never appears | Wrong network key | Use the canonical key from the Registry |
For anything else, contact your account manager with the log output and the tag TapMindAdapter.