
Unity LevelPlay
Unity LevelPlay react-native guide for Custom Adapter (GMA SDK).
Prerequisites
Performed by: Developer
- See the Compatibility Matrix for the minimum Android and iOS versions for this package.
Install the SDK
Performed by: Developer
Ensure your android/build.gradle (project-level) includes the required repositories:
allprojects {
    repositories {
        google()
        mavenCentral()
        maven { url 'https://jitpack.io' }
    }
}
Note: On Gradle 7+, use Gradle Setup (Gradle 7+) instead - declare repositories in settings.gradle under dependencyResolutionManagement and remove the allprojects block. Use one approach, not both.
Android
Add to package.json and install via npm/yarn:
tapmind_ads_ironsource: "2.1.4"
Also require react-native-google-mobile-ads.
Note: AdMob and GAM adapters pin play-services-ads:25.0.0 on Android. AppLovin MAX and Unity LevelPlay adapters use compatible GMA version resolution.
iOS
Add to package.json and install via npm/yarn:
tapmind_ads_ironsource: "2.1.4"
Also require react-native-google-mobile-ads.
Add the following post_install hook to your app's Podfile (alongside use_native_modules! and react_native_post_install):
post_install do |installer|
  react_native_post_install(
    installer,
    config[:reactNativePath],
    :mac_catalyst_enabled => false,
  )
  installer.pods_project.targets.each do |target|
    target.build_configurations.each do |config|
      config.build_settings['ENABLE_USER_SCRIPT_SANDBOXING'] = 'NO'
      config.build_settings['CLANG_ALLOW_NON_MODULAR_INCLUDES_IN_FRAMEWORK_MODULES'] = 'YES'
      config.build_settings['CLANG_WARN_DEPRECATED_OBJC_IMPLEMENTATIONS'] = 'NO'
      config.build_settings['GCC_WARN_PEDANTIC'] = 'NO'
      if target.name == 'fmt'
        config.build_settings['CLANG_CXX_LANGUAGE_STANDARD'] = 'c++17'
      end
    end
  end
end
Configure Unity LevelPlay
Performed by: Ad ops
Create the TapMind network: Monetize → Setup → SDK Networks → Available Networks → Manage Networks → select Custom Adapter → enter network key 15c11cb1d → Enter → Save. The network appears as TapMind.
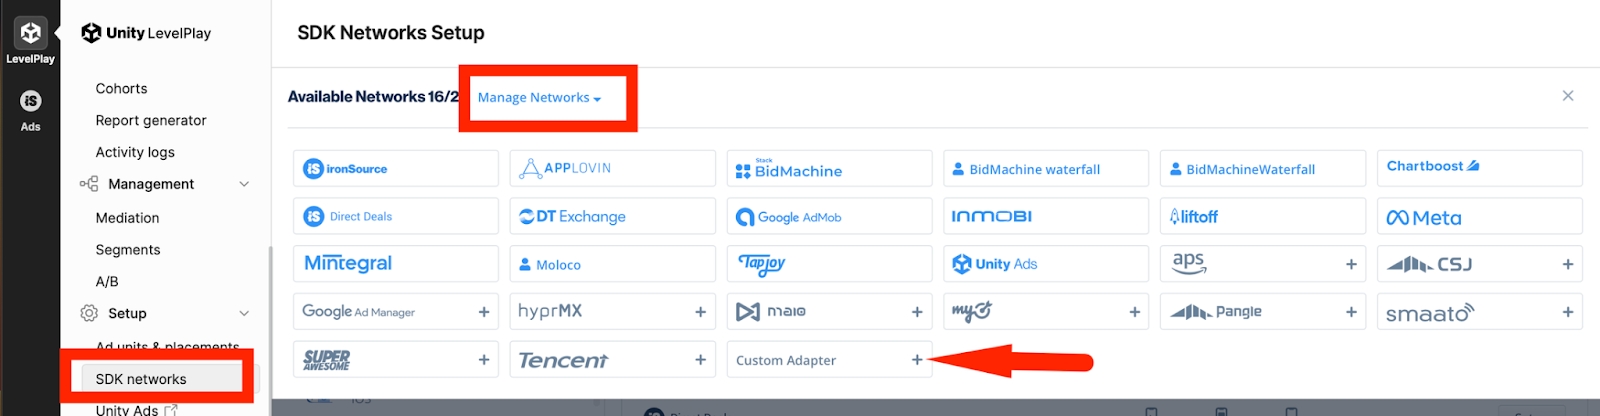
Set up instances: Setup → Instances → select TapMind Marketplace → Add ad instance → select ad type →
Instance name : provided by your account manager
placementCODE : provided by your account manager
Mediation Group: Select your target mediation group
Rate : provided by your account manager
Note: Enter the rate for each placement - it determines waterfall order. Add one instance per ad format to start.
Verify integration
Performed by: Developer
After install and dashboard configuration:
- Run your app in a debug build. TapMind's test mode is enabled automatically in debug builds and serves test ads at a high fill rate.
- Request an ad through your mediation SDK as you normally would.
- Confirm a TapMind ad fills. Check logs for the tag
TapMindAdapter. - When verified, build in release mode for production - test mode is disabled automatically in release builds, and live ads serve.
Note: Test mode is automatic. It follows your build type: debug = test ads, release = live ads. There is no flag to enable or disable, and nothing to turn off before going live.
Release build QA: There is currently no documented release-safe test path to validate R8/ProGuard without serving live ads. Consumer ProGuard rules from the TapMind AAR are applied automatically when you integrate the published adapter packages.
Troubleshooting
Performed by: Developer
Before diving into logs, confirm adapter class names and the LevelPlay network key against the Class & Network Key Registry, and placementName and eCPM/rate with your account manager.
See Troubleshooting for common symptoms, mediation-specific fixes, release vs debug guidance, and escalation steps. Partner-specific verification steps are under Verify integration above.