Unity iOS Integration Guide
AdMob
Installation
Configuration Steps
Adding Dependency
- Open Unity Editor.
- Go to Window → Package Manager.
- Click the “+” (Add) button in the top-left corner.
- Select Install package from Git URL…
- Paste the following Git URL and click Install:
-
https://github.com/tapmind-tech/TapMind-CA-Admob-Unity.git
-
- Wait for the package to finish installing successfully.
- Once installed, the TapMind Unity SDK will be available in your Unity project and ready for integration.
Configuration
CREATING CUSTOM EVENTS FOR WATERFALL
- Under the Mediation tab : Click on Create Mediation group section
- Select IOS and type of Ad format and Continue
- In the Name field : Type in as provided in the G-sheet
- Click on Add ad units
- Select the app and the Ad units that you want to use custom targeting on.
Add Custom Event → Create Mediation Group → Select IOS → Add Name → Add Ad units → Select app and Ad units
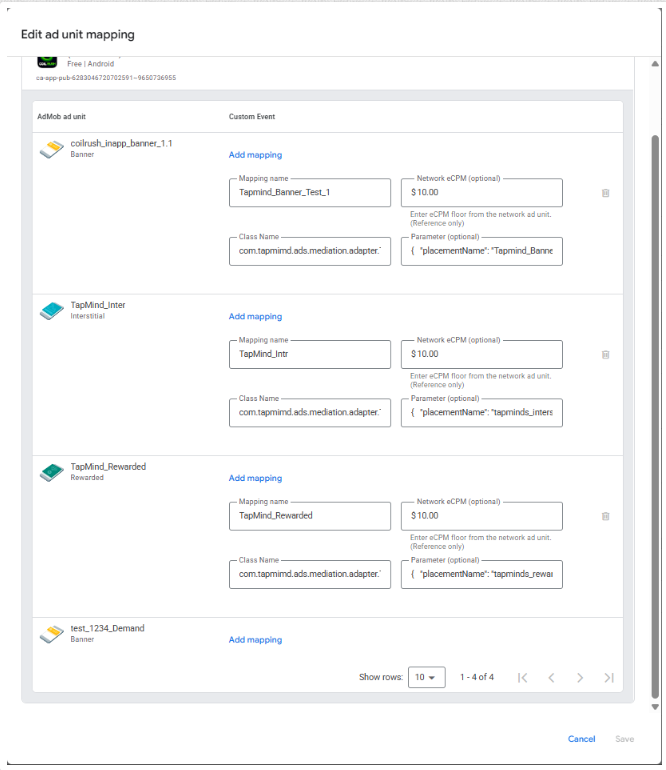
AD SOURCES (WATERFALL SECTION)
- Click on Water fall source
- Click on Setup ad Source and then at the Bottom left Click on custom event
- Select the App for the setup (IOS)
- Select ad unit and add the parameters as follows
For the Below details Please reach out TapMind Account Manger
Mapping name : As Per the G-sheet Provided
ecpm : As Per the G-sheet Provided
Class : TapMindMediationAdapterAdmob
Parameter : { "placementName": "As Per the G-sheet Provided"}
Ad Sources → Add Custom Event → Enter Label → Set eCPM → Add Mapping → Enter Mapping Name → Enter Class Name → Add Parameter
Response can be checked in LOGCAT by using tag: TapMindAdapter
The above setup completes our TapMind x ADMOB integration. You should see an Ad if test setup is complete and working fine.
Official Google Documentation for creating a custom event : https://support.google.com/admob/answer/13407144
Google Ad Manager
PREREQUISITES
- An Ad Unit must already be in place which will be used for targeting.
GOOGLE AD MANAGER CONFIGURATION
Please go through the below steps to integrate TapMind as a demand partner with your GAM account. To begin with the integration, login to your GAM account and follow the below steps.
- Under the Admin header : Click on the Companies section
- Click on the New Company button : Select Ad Network
- In the Name field : Type In TapMind
- In the Ad Network field : Select Other Company
- Toggle Mediation to ON
- Click on Save
Installation
Configuration Steps
Adding Dependency
- Open Unity Editor.
- Go to Window → Package Manager.
- Click the “+” (Add) button in the top-left corner.
- Select Install package from Git URL…
- Paste the following Git URL and click Install:
-
https://github.com/tapmind-tech/TapMind-CA-Admob-Unity.git
-
- Wait for the package to finish installing successfully.
- Once installed, the TapMind Unity SDK will be available in your Unity project and ready for integration.
Configuration
- An Ad Unit must already be in place which will be used for targeting.
GOOGLE AD MANAGER CONFIGURATION
Please go through the below steps to integrate TapMind as a demand partner with your GAM account. To begin with the integration, login to your GAM account and follow the below steps.
- Under the Admin header : Click on the Companies section
- Click on the New Company button : Select Ad Network
- In the Name field : Type In TapMind
- In the Ad Network field : Select Other Company
- Toggle Mediation to ON
- Click on Save
Login GAM → Admin → Companies → New Company → Select Company Type (Ad Network) → Enter Name (TapMind) → Select Ad Network (Other Company) → Enable Mediation → Save
CREATING YIELD GROUP AND YIELD PARTNER
For adding TapMind under existing yield groups, skip the steps for creating a new yield group, navigate to your existing yield group and follow the steps for Adding Yield Partner as described in the next section
- Under the “Delivery” tab : Click on “Yield Groups” section
- Click on “New Yield Group” to create a new yield group
- In the Name field : Type in as provided in the G-sheet
- Ad Format : As Per the G-sheet Provided
- Inventory Type : Mobile
- Under Targeting : Select the Ad Units which "TapMind" will target
- Scroll to the bottom
Delivery → Yield Groups → New Yield Group → Enter Name (from sheet) → Select Ad Format → Select Inventory Type (Mobile) → Select Ad Units (TapMind) → Scroll Down
ADDING YIELD PARTNER
- Click on “Add Yield Partner”
- Select “TapMind” from the list
Add details as provided below in Yield Partner
Integration Type : Custom Event
Platform : IOS
Status : Active
For the Below details Please reach out TapMind Account Manger
Default Cpm : As Per the G-sheet Provided
Label : As Per the G-sheet Provided
Class Name : TapMindMediationAdapterAdmob
Parameter : { "placementName": "As Per the G-sheet Provided"}
- Click on “Save” and save the configuration.
- The actual number of entries, manual eCPM, etc. will be shared once the test setup is complete.
The above setup completes our TapMind x GAM integration. You should see an Ad if test setup is complete and working fine.
Add Yield Partner → Select TapMind → Integration Type (Custom Event) → Platform (IOS) → Set Status (Active) → Enter Default CPM (from sheet) → Enable Override CPM → Enter Label (from sheet) → Enter Class Name → Enter Parameter → Save
Response can be checked in LOGCAT by using tag: TapMindAdapter
Official Google Documentation for creating a Yield Group :
https://support.google.com/admanager/answer/7390828?hl=en
AppLovin
Installation
App Prerequisite
- Ensure Google Mobile Ads SDK is already integrated; if not, install it before adding the TapMinds adapter.
Configuration Steps
Adding Dependency
- Open Unity Editor.
- Go to Window → Package Manager.
- Click the “+” (Add) button in the top-left corner.
- Select Install package from Git URL…
- Paste the following Git URL and click Install:
-
https://github.com/tapmind-tech/TapMind-CA-Applovin-Unity.git
-
- Wait for the package to finish installing successfully.
- Once installed, the TapMind Unity SDK will be available in your Unity project and ready for integration.
Import the Google Mobile Ads for Unity plugin
- Download the latest
.unitypackagerelease from GitHub. - Import the
.unitypackagefile by selecting the Unity menu option Assets > Import package > Custom Package and importing all items.
Set your AdMob app ID
In the Unity editor, select Assets > Google Mobile Ads > Settings from the menu.
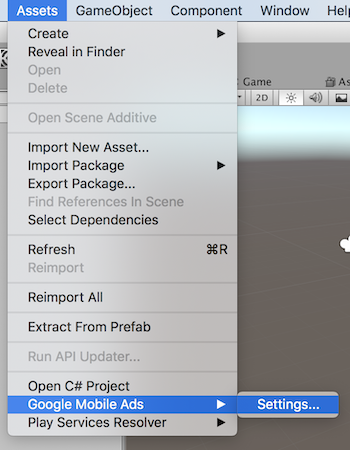
Enter your Android and iOS AdMob app ID in each field.

Configuration
PREREQUISITES
- An Ad Unit must already be in place which will be used for targeting.
APPLOVIN CONFIGURATION
Please go through the below steps to integrate TapMinds as a demand partner with your APPLOVIN account. To begin with the integration, login to your APPLOVIN account and follow the below steps.
- In the MAX Dashboard, select MAX > Mediation > Manage > Networks.
- Click on Click here to add a Custom Network at the bottom of the page. The Create Custom Network page appears.
Custom Network: TapMind Market Place
IOS Class: TapMindMediationAdapterApplovin
- Click on Save.
MAX → Mediation → Manage → Networks → Click Add Custom Network → Select Network Type (SDK) → Enter iOS Class Name → Save
ADDING YIELD PARTNER
- Open MAX > Mediation > Manage > Ad Units in the MAX dashboard.
- Select the Ad Unit of type(Banner, Interstital or Rewarded) to which you want to add TapMind as a custom adapter.
- Select TapMind from the custom network menu to enable and enter the information for each placement. Below are the test setup details
Contact your account manager to see what values you need to set for the final list of production setup (Placement ID, Custom Parameters and CPM Price).
App ID = Leave it blank (its optional)
Placement ID = "As Per the G-sheet Provided"
eCPM: As Per the G-sheet Provided
Custom Parameters = {"placementName":"As Per the G-sheet Provided"}
- Click on “Save” and save the configuration.
MAX → Mediation → Manage Ad Units → Select Ad Unit → Select TapMind → Enter Placement ID → Enter eCPM → Enter Custom Parameters → Save
Response can be checked in LOGCAT by using tag: TapMindAdapter
The above setup completes our TapMind x Applovin integration. You should see an Ad if test setup is complete and working fine.
IronSource LevelPlay
Installation
App Prerequisite
- Ensure Google Mobile Ads SDK is already integrated; if not, install it before adding the TapMinds adapter.
Configuration Steps
Adding Dependency
- Open Unity Editor.
- Go to Window → Package Manager.
- Click the “+” (Add) button in the top-left corner.
- Select Install package from Git URL…
- Paste the following Git URL and click Install:
-
https://github.com/tapmind-tech/TapMind-CA-Ironsource-Unity.git
-
- Wait for the package to finish installing successfully.
- Once installed, the TapMind Unity SDK will be available in your Unity project and ready for integration.
Import the Google Mobile Ads for Unity plugin
- Download the latest
.unitypackagerelease from GitHub. - Import the
.unitypackagefile by selecting the Unity menu option Assets > Import package > Custom Package and importing all items.
Set your AdMob app ID
In the Unity editor, select Assets > Google Mobile Ads > Settings from the menu.
Enter your Android and iOS AdMob
Configuration
PREREQUISITES
- An Ad Unit must already be in place which will be used for targeting.
Levelplay UI CONFIGURATION
From Levelplay UI (Operational / Configuration Process)
Create a TapMind waterfall Network
Please go through the below steps to integrate TapMind as a demand partner with your IRONSOUCE-LEVELPLAY account. To begin with the integration, login to your IRONSOUCE-LEVELPLAY account and follow the below steps.
- On the Ironsource platform, select Monetize → Setup → SDK Networks.
- Select Available Networks → Manage Networks. In the dropdown list of available networks, select Custom Adapter.
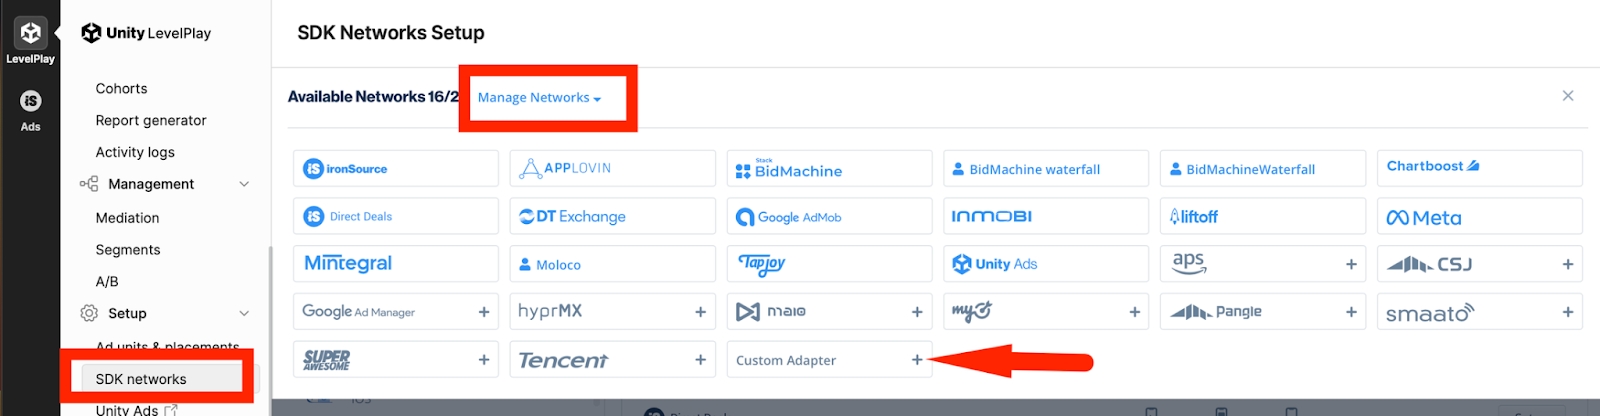
- To enable the TapMind Adapter, input Network Key
15c101ba1, then click on the Enter key, and save. The name of the network should appear as TapMind. - Click save, your TapMind network is now ready.
Login LevelPlay → Monetize → Setup → SDK Networks → Available Networks → Manage Networks → Select Custom Adapter → Enter Network Key → Press Enter → Save → TapMind Network Created
It is highly recommended to enter the Rate (that has been provided by TapMind for each placement id), as this determines the correct order in the waterfalls. Repeat the above setup for each ad-format type. To start with, only add one instance for each format only, and use the discussed eCPM rate for waterfall.
Setup Instances
- In the Left Side Navigation Menu click Instances under Setup.
- Click TapMind Network listed under Custom.
- Click on Ad Instance and select Ad type as Per the G-sheet Provided.
For the Below details Please reach out TapMind Account Manger
Instance Name : As Per the G-sheet Provided
ecpm : As Per the G-sheet Provided
Setup → Instances → Select TapMind (Custom) → Add Ad Instance → Select Ad Type (from sheet) → Enter Instance Name (from sheet) → Select Mediation Groups → Enter Rate (from sheet)
Response can be checked in LOGCAT by using tag: TapMindAdapter
Testing instructions
Before deploying the TapMind SDK and adapter to your live application, you can perform testing with the test mode. This will guarantee a high fill rate (99.99%) during the integration testing process, ensuring that the implementation is functioning correctly. It is crucial to disable the test mode before going live, as failing to do so will result in financial loss.