---
description: >-
Native iOS integration guide for TapMind Custom Adapter across AdMob, Google Ad Manager, AppLovin, and IronSource LevelPlay.
---
> **For AI agents:** the complete documentation index is at [llms.txt](/llms.txt). Append `.md` to any page URL for its markdown version.
import DocTagAdmobGam from '/snippets/doc-tag-admob-gam.mdx'
import DocTagApplovin from '/snippets/doc-tag-applovin.mdx'
import DocTagIronsource from '/snippets/doc-tag-ironsource.mdx'
# Native iOS Integration Guide
## AdMob
**PREREQUISITES**
* An Ad Unit must already be in place which will be used for targeting.
### Installation
**Installation via CocoaPods**
To integrate TapMinds custom adapter SDK into your Xcode project using CocoaPods, follow these steps:
1. Open your project's Podfile and add:
Copy
```
pod 'TapMindAdapter'
```
2. Run the following command in the terminal:
Copy
```
pod install
```
3. After installation, close Xcode and open the .xcworkspace file instead of .xcodeproj.
**Installation via SPM**
1. In Xcode, install the TapMind custom adapter SDK Swift Package by navigating to **File > Add Package Dependencies.**
2. In the prompt that appears, search for the below GitHub repository:
```
https://github.com/tapmind-tech/TapMind-Custom-Adapter-iOS.git
```
3. Select the version of the TapMind SDK Swift Package you want to use. For new projects, we recommend using the **Up to Next Major Version**.
**Important (SPM Integration)**\
When integrating this SDK via **Swift Package Manager**, make sure to add the **`-ObjC`** flag to your app target.
Go to **Targets → Build Settings → Other Linker Flags** and add: -ObjC
### Configuration
**CREATING CUSTOM EVENTS FOR WATERFALL**
1. Under the **Mediation** tab : Click on **Create Mediation group** section
2. Select **IOS** and type of Ad format and Continue
3. In the Name field : Type in as provided in the **G-sheet**
4. Click on **Add ad units**
5. Select the app and the Ad units that you want to use custom targeting on.
**Add Custom Event** → **Create Mediation Group** → **Select IOS** → **Add Name** → **Add Ad units** → **Select app and Ad units**
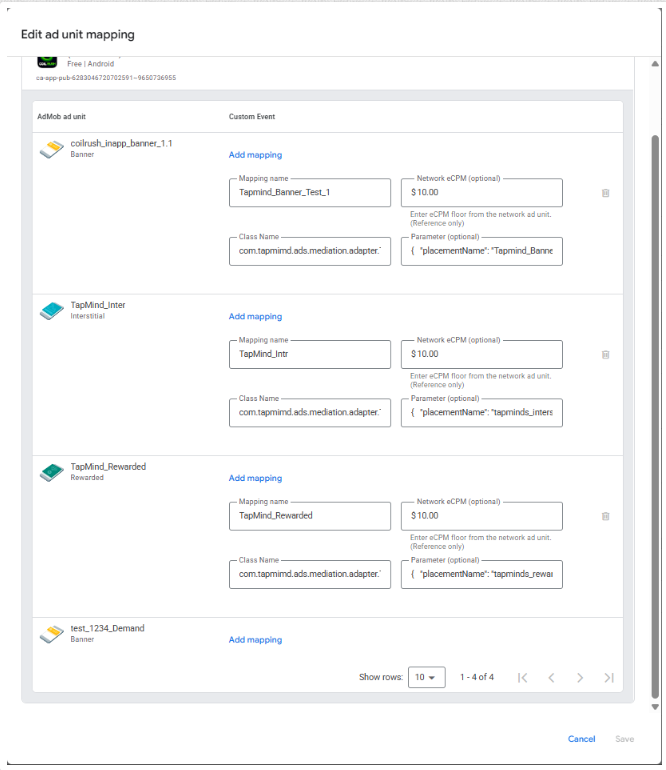
**AD SOURCES (WATERFALL SECTION)**
1. Click on Water fall source
2. Click on Setup ad Source and then at the Bottom left Click on custom event
3. Select the App for the setup (IOS)
4. Select ad unit and add the parameters as follows
For the Below details Please reach out TapMind Account Manger
```
Mapping name : As Per the G-sheet Provided
ecpm : As Per the G-sheet Provided
Class : TapMindMediationAdapterAdmob
Parameter : { "placementName": "As Per the G-sheet Provided"}
```
**Ad Sources → Add Custom Event → Enter Label → Set eCPM → Add Mapping → Enter Mapping Name → Enter Class Name → Add Parameter**
The above setup completes our **TapMind x ADMOB** integration. You should see an Ad if test setup is complete and working fine.
Official Google Documentation for creating a custom event : [https://support.google.com/admob/answer/13407144](https://support.google.com/admob/answer/13407144)
## Google Ad Manager
**PREREQUISITES**
* An Ad Unit must already be in place which will be used for targeting.
**GOOGLE AD MANAGER CONFIGURATION**
Please go through the below steps to integrate **TapMind** as a demand partner with your **GAM** account. To begin with the integration, login to your **GAM** account and follow the below steps.
1. Under the **Admin** header : Click on the **Companies** section
2. Click on the **New Company** button : Select **Ad Network**
3. In the Name field : Type In **TapMind**
4. In the **Ad Network** field : Select **Other Company**
5. Toggle **Mediation** to **ON**
6. Click on **Save**
### Installation
##### **Installation via CocoaPods**
To integrate TapMinds custom adapter SDK into your Xcode project using CocoaPods, follow these steps:
1. Open your project's Podfile and add:
Copy
```
pod 'TapMindAdapter'
```
2. Run the following command in the terminal:
Copy
```
pod install
```
3. After installation, close Xcode and open the .xcworkspace file instead of .xcodeproj.
##### **Installation via SPM**
1. In Xcode, install the TapMind custom adapter SDK Swift Package by navigating to **File > Add Package Dependencies.**
2. In the prompt that appears, search for the below GitHub repository:
```
https://github.com/tapmind-tech/TapMind-Custom-Adapter-iOS.git
```
3. Select the version of the TapMind SDK Swift Package you want to use. For new projects, we recommend using the **Up to Next Major Version**.
**Important (SPM Integration)**\
When integrating this SDK via **Swift Package Manager**, make sure to add the **`-ObjC`** flag to your app target.
Go to **Targets → Build Settings → Other Linker Flags** and add: -ObjC
### Configuration
* An Ad Unit must already be in place which will be used for targeting.
**GOOGLE AD MANAGER CONFIGURATION**
Please go through the below steps to integrate **TapMind** as a demand partner with your **GAM** account. To begin with the integration, login to your **GAM** account and follow the below steps.
1. Under the **Admin** header : Click on the **Companies** section
2. Click on the **New Company** button : Select **Ad Network**
3. In the Name field : Type In **TapMind**
4. In the **Ad Network** field : Select **Other Company**
5. Toggle **Mediation** to **ON**
6. Click on **Save**
**Login GAM → Admin → Companies → New Company → Select Company Type (Ad Network) → Enter Name (TapMind) → Select Ad Network (Other Company) → Enable Mediation → Save**
**CREATING YIELD GROUP AND YIELD PARTNER**
For adding **TapMind** under existing yield groups, skip the steps for creating a new yield group, navigate to your existing yield group and follow the steps for **Adding Yield Partner** as described in the next section
1. Under the “**Delivery**” tab : Click on “**Yield Groups**” section
2. Click on “**New Yield Group**” to create a new yield group
3. In the Name field : Type in as provided in the **G-sheet**
4. Ad Format : As Per the G-sheet Provided
5. Inventory Type : **Mobile**
6. Under Targeting : Select the Ad Units which "**TapMind**" will target
7. Scroll to the bottom
**Delivery → Yield Groups → New Yield Group → Enter Name (from sheet) → Select Ad Format → Select Inventory Type (Mobile) → Select Ad Units (TapMind) → Scroll Down**
**ADDING YIELD PARTNER**
1. Click on “**Add Yield Partner**”
2. Select “**TapMind**” from the list
Add details as provided below in Yield Partner
```
Integration Type : Custom Event
Platform : IOS
Status : Active
```
For the Below details Please reach out TapMind Account Manger
```
Default Cpm : As Per the G-sheet Provided
Label : As Per the G-sheet Provided
Class Name : TapMindMediationAdapterGAM
Parameter : { "placementName": "As Per the G-sheet Provided"}
```
3. Click on “**Save**” and save the configuration.
4. The actual number of entries, manual eCPM, etc. will be shared once the test setup is complete.
The above setup completes our **TapMind x GAM** integration. You should see an Ad if test setup is complete and working fine.
**Add Yield Partner → Select TapMind → Integration Type (Custom Event) → Platform (IOS) → Set Status (Active) → Enter Default CPM (from sheet) → Enable Override CPM → Enter Label (from sheet) → Enter Class Name → Enter Parameter → Save**
Official Google Documentation for creating a Yield Group :
\
https://support.google.com/admanager/answer/7390828?hl=en
## AppLovin
### Installation
**App Prerequisite**
* Install either **CocoaPods** (recommended) or use **Swift Package Manager** to manage dependencies in your Xcode project.
* Ensure **Google Mobile Ads SDK** is already integrated; if not, install it before adding the TapMinds adapter.
**Installation via CocoaPods**
To integrate TapMinds custom adapter SDK into your Xcode project using CocoaPods, follow these steps:
1. Open your project's Podfile and add:
Copy
```
pod 'TapMindALAdapter'
```
2. Run the following command in the terminal:
Copy
```
pod install
```
3. After installation, close Xcode and open the .xcworkspace file instead of .xcodeproj.
##### **Installation via SPM**
1. In Xcode, install the TapMind custom adapter SDK Swift Package by navigating to **File > Add Package Dependencies.**
2. In the prompt that appears, search for the below GitHub repository:
```
https://github.com/tapmind-tech/TapMind-CA-Applovin-iOS.git
```
3. Select the version of the TapMind SDK Swift Package you want to use. For new projects, we recommend using the **Up to Next Major Version**.
**Important (SPM Integration)**\
When integrating this SDK via **Swift Package Manager**, make sure to add the **`-ObjC`** flag to your app target.
Go to **Targets → Build Settings → Other Linker Flags** and add: -ObjC
##### Import Google Mobile Ads SDK
##### **Installation via CocoaPods**
Before you continue, review [Using CocoaPods](https://guides.cocoapods.org/using/using-cocoapods) for information on creating and using Podfiles.
To use [CocoaPods](https://guides.cocoapods.org/using/getting-started), follow these steps:
1. Open your project's Podfile and add this line to your app's `target` build configuration:
```
pod 'Google-Mobile-Ads-SDK'
```
2. In a terminal, run:
```
pod install --repo-update
```
##### Update your Info.plist
Update your app's `Info.plist` file to add two keys:
1. A `GADApplicationIdentifier` key with a string value of your AdMob app ID [found in the AdMob UI](https://support.google.com/admob/answer/7356431).
2. A `SKAdNetworkItems` key with `SKAdNetworkIdentifier` values for Google (`cstr6suwn9.skadnetwork`) and [select third-party buyers](https://developers.google.com/admob/ios/3p-skadnetworks) who have provided these values to Google.
**Complete snippet**
```
GADApplicationIdentifier
SAMPLE_APP_ID
SKAdNetworkItems
SKAdNetworkIdentifier
cstr6suwn9.skadnetwork
SKAdNetworkIdentifier
4fzdc2evr5.skadnetwork
SKAdNetworkIdentifier
2fnua5tdw4.skadnetwork
SKAdNetworkIdentifier
ydx93a7ass.skadnetwork
SKAdNetworkIdentifier
p78axxw29g.skadnetwork
SKAdNetworkIdentifier
v72qych5uu.skadnetwork
SKAdNetworkIdentifier
ludvb6z3bs.skadnetwork
SKAdNetworkIdentifier
cp8zw746q7.skadnetwork
SKAdNetworkIdentifier
3sh42y64q3.skadnetwork
SKAdNetworkIdentifier
c6k4g5qg8m.skadnetwork
SKAdNetworkIdentifier
s39g8k73mm.skadnetwork
SKAdNetworkIdentifier
wg4vff78zm.skadnetwork
SKAdNetworkIdentifier
3qy4746246.skadnetwork
SKAdNetworkIdentifier
f38h382jlk.skadnetwork
SKAdNetworkIdentifier
hs6bdukanm.skadnetwork
SKAdNetworkIdentifier
mlmmfzh3r3.skadnetwork
SKAdNetworkIdentifier
v4nxqhlyqp.skadnetwork
SKAdNetworkIdentifier
wzmmz9fp6w.skadnetwork
SKAdNetworkIdentifier
su67r6k2v3.skadnetwork
SKAdNetworkIdentifier
yclnxrl5pm.skadnetwork
SKAdNetworkIdentifier
t38b2kh725.skadnetwork
SKAdNetworkIdentifier
7ug5zh24hu.skadnetwork
SKAdNetworkIdentifier
gta9lk7p23.skadnetwork
SKAdNetworkIdentifier
vutu7akeur.skadnetwork
SKAdNetworkIdentifier
y5ghdn5j9k.skadnetwork
SKAdNetworkIdentifier
v9wttpbfk9.skadnetwork
SKAdNetworkIdentifier
n38lu8286q.skadnetwork
SKAdNetworkIdentifier
47vhws6wlr.skadnetwork
SKAdNetworkIdentifier
kbd757ywx3.skadnetwork
SKAdNetworkIdentifier
9t245vhmpl.skadnetwork
SKAdNetworkIdentifier
a2p9lx4jpn.skadnetwork
SKAdNetworkIdentifier
22mmun2rn5.skadnetwork
SKAdNetworkIdentifier
44jx6755aq.skadnetwork
SKAdNetworkIdentifier
k674qkevps.skadnetwork
SKAdNetworkIdentifier
4468km3ulz.skadnetwork
SKAdNetworkIdentifier
2u9pt9hc89.skadnetwork
SKAdNetworkIdentifier
8s468mfl3y.skadnetwork
SKAdNetworkIdentifier
klf5c3l5u5.skadnetwork
SKAdNetworkIdentifier
ppxm28t8ap.skadnetwork
SKAdNetworkIdentifier
kbmxgpxpgc.skadnetwork
SKAdNetworkIdentifier
uw77j35x4d.skadnetwork
SKAdNetworkIdentifier
578prtvx9j.skadnetwork
SKAdNetworkIdentifier
4dzt52r2t5.skadnetwork
SKAdNetworkIdentifier
tl55sbb4fm.skadnetwork
SKAdNetworkIdentifier
c3frkrj4fj.skadnetwork
SKAdNetworkIdentifier
e5fvkxwrpn.skadnetwork
SKAdNetworkIdentifier
8c4e2ghe7u.skadnetwork
SKAdNetworkIdentifier
3rd42ekr43.skadnetwork
SKAdNetworkIdentifier
97r2b46745.skadnetwork
SKAdNetworkIdentifier
3qcr597p9d.skadnetwork
```
Replace SAMPLE\_APP\_ID with your AdMob app ID. While testing, use the sample app ID shown in the previous example.
**Installation via SPM**
**Key Point:** Mediation adapter libraries are not yet available on Swift Package Manager. If you use [mediation](https://developers.google.com/admob/ios/mediation), we recommend integrating with CocoaPods.
To [add a package dependency](https://developer.apple.com/documentation/xcode/adding-package-dependencies-to-your-app#Add-a-package-dependency) to your project, follow these steps:
1. In Xcode, install the Google Mobile Ads Swift Package by navigating to **File > Add Package Dependencies...**.
2. In the prompt that appears, search for the Google Mobile Ads Swift Package GitHub repository:
```
https://github.com/googleads/swift-package-manager-google-mobile-ads.git
```
3. Select the version of the Google Mobile Ads Swift Package you want to use. For new projects, we recommend using the **Up to Next Major Version**.
### Configuration
**PREREQUISITES**
* An Ad Unit must already be in place which will be used for targeting.
##### **APPLOVIN CONFIGURATION**
Please go through the below steps to integrate **TapMinds** as a demand partner with your **APPLOVIN** account. To begin with the integration, login to your **APPLOVIN** account and follow the below steps.
1. In the MAX Dashboard, select [MAX > Mediation > Manage > Networks](https://dash.applovin.com/o/mediation/networks/).
2. Click on **Click here to add a Custom Network** at the bottom of the page. The Create Custom Network page appears.
```
Custom Network: TapMind Market Place
IOS Class: TapMindMediationAdapterApplovin
```
3. Click on **Save**.
**MAX → Mediation → Manage → Networks → Click Add Custom Network → Select Network Type (SDK) → Enter iOS Class Name → Save**
**ADDING YIELD PARTNER**
1. Open [MAX > Mediation > Manage > Ad Units](https://dash.applovin.com/o/mediation/ad_units/) in the MAX dashboard.
2. Select the Ad Unit of type(Banner, Interstital or Rewarded) to which you want to add **TapMind** as a custom adapter.
3. Select **TapMind** from the custom network menu to **enable** and enter the information for each placement. Below are the test setup details
Contact your account manager to see what values you need to set for the **final list of production setup (Placement ID**, **Custom Parameters** and **CPM Price)**.
```
App ID = Leave it blank (its optional)
Placement ID = "As Per the G-sheet Provided"
eCPM: As Per the G-sheet Provided
Custom Parameters = {"placementName":"As Per the G-sheet Provided"}
```
4. Click on “Save” and save the configuration.
**MAX → Mediation → Manage Ad Units → Select Ad Unit → Select TapMind → Enter Placement ID → Enter eCPM → Enter Custom Parameters → Save**
The above setup completes our **TapMind x Applovin** integration. You should see an Ad if test setup is complete and working fine.
## IronSource LevelPlay
### Installation
**App Prerequisite**
* Install either **CocoaPods** (recommended) or use **Swift Package Manager** to manage dependencies in your Xcode project.
* Ensure **Google Mobile Ads SDK** is already integrated; if not, install it before adding the TapMinds adapter.
**Installation via CocoaPods**
To integrate TapMinds custom adapter SDK into your Xcode project using CocoaPods, follow these steps:
1. Open your project's Podfile and add:
Copy
```
pod 'TapMindISAdapter'
```
2. Run the following command in the terminal:
Copy
```
pod install
```
3. After installation, close Xcode and open the .xcworkspace file instead of .xcodeproj.
##### **Installation via SPM**
1. In Xcode, install the TapMind custom adapter SDK Swift Package by navigating to **File > Add Package Dependencies.**
2. In the prompt that appears, search for the below GitHub repository: [https://github.com/tapmind-tech/TapMind-CA-Unity-Levelplay-iOS.git](https://github.com/tapmind-tech/TapMind-CA-Unity-Levelplay-iOS.git)
3. Select the version of the TapMind SDK Swift Package you want to use. For new projects, we recommend using the **Up to Next Major Version**.
**Important (SPM Integration)**\
When integrating this SDK via **Swift Package Manager**, make sure to add the **`-ObjC`** flag to your app target.
Go to **Targets → Build Settings → Other Linker Flags** and add: -ObjC
##### Import Google Mobile Ads SDK
##### **Installation via CocoaPods**
Before you continue, review [Using CocoaPods](https://guides.cocoapods.org/using/using-cocoapods) for information on creating and using Podfiles.
To use [CocoaPods](https://guides.cocoapods.org/using/getting-started), follow these steps:
1. Open your project's Podfile and add this line to your app's `target` build configuration:
```
pod 'Google-Mobile-Ads-SDK'
```
2. In a terminal, run:
```
pod install --repo-update
```
##### Update your Info.plist
Update your app's `Info.plist` file to add two keys:
1. A `GADApplicationIdentifier` key with a string value of your AdMob app ID [found in the AdMob UI](https://support.google.com/admob/answer/7356431).
2. A `SKAdNetworkItems` key with `SKAdNetworkIdentifier` values for Google (`cstr6suwn9.skadnetwork`) and [select third-party buyers](https://developers.google.com/admob/ios/3p-skadnetworks) who have provided these values to Google.
**Complete snippet**
```
GADApplicationIdentifier
SAMPLE_APP_ID
SKAdNetworkItems
SKAdNetworkIdentifier
cstr6suwn9.skadnetwork
SKAdNetworkIdentifier
4fzdc2evr5.skadnetwork
SKAdNetworkIdentifier
2fnua5tdw4.skadnetwork
SKAdNetworkIdentifier
ydx93a7ass.skadnetwork
SKAdNetworkIdentifier
p78axxw29g.skadnetwork
SKAdNetworkIdentifier
v72qych5uu.skadnetwork
SKAdNetworkIdentifier
ludvb6z3bs.skadnetwork
SKAdNetworkIdentifier
cp8zw746q7.skadnetwork
SKAdNetworkIdentifier
3sh42y64q3.skadnetwork
SKAdNetworkIdentifier
c6k4g5qg8m.skadnetwork
SKAdNetworkIdentifier
s39g8k73mm.skadnetwork
SKAdNetworkIdentifier
wg4vff78zm.skadnetwork
SKAdNetworkIdentifier
3qy4746246.skadnetwork
SKAdNetworkIdentifier
f38h382jlk.skadnetwork
SKAdNetworkIdentifier
hs6bdukanm.skadnetwork
SKAdNetworkIdentifier
mlmmfzh3r3.skadnetwork
SKAdNetworkIdentifier
v4nxqhlyqp.skadnetwork
SKAdNetworkIdentifier
wzmmz9fp6w.skadnetwork
SKAdNetworkIdentifier
su67r6k2v3.skadnetwork
SKAdNetworkIdentifier
yclnxrl5pm.skadnetwork
SKAdNetworkIdentifier
t38b2kh725.skadnetwork
SKAdNetworkIdentifier
7ug5zh24hu.skadnetwork
SKAdNetworkIdentifier
gta9lk7p23.skadnetwork
SKAdNetworkIdentifier
vutu7akeur.skadnetwork
SKAdNetworkIdentifier
y5ghdn5j9k.skadnetwork
SKAdNetworkIdentifier
v9wttpbfk9.skadnetwork
SKAdNetworkIdentifier
n38lu8286q.skadnetwork
SKAdNetworkIdentifier
47vhws6wlr.skadnetwork
SKAdNetworkIdentifier
kbd757ywx3.skadnetwork
SKAdNetworkIdentifier
9t245vhmpl.skadnetwork
SKAdNetworkIdentifier
a2p9lx4jpn.skadnetwork
SKAdNetworkIdentifier
22mmun2rn5.skadnetwork
SKAdNetworkIdentifier
44jx6755aq.skadnetwork
SKAdNetworkIdentifier
k674qkevps.skadnetwork
SKAdNetworkIdentifier
4468km3ulz.skadnetwork
SKAdNetworkIdentifier
2u9pt9hc89.skadnetwork
SKAdNetworkIdentifier
8s468mfl3y.skadnetwork
SKAdNetworkIdentifier
klf5c3l5u5.skadnetwork
SKAdNetworkIdentifier
ppxm28t8ap.skadnetwork
SKAdNetworkIdentifier
kbmxgpxpgc.skadnetwork
SKAdNetworkIdentifier
uw77j35x4d.skadnetwork
SKAdNetworkIdentifier
578prtvx9j.skadnetwork
SKAdNetworkIdentifier
4dzt52r2t5.skadnetwork
SKAdNetworkIdentifier
tl55sbb4fm.skadnetwork
SKAdNetworkIdentifier
c3frkrj4fj.skadnetwork
SKAdNetworkIdentifier
e5fvkxwrpn.skadnetwork
SKAdNetworkIdentifier
8c4e2ghe7u.skadnetwork
SKAdNetworkIdentifier
3rd42ekr43.skadnetwork
SKAdNetworkIdentifier
97r2b46745.skadnetwork
SKAdNetworkIdentifier
3qcr597p9d.skadnetwork
```
Replace SAMPLE\_APP\_ID with your AdMob app ID. While testing, use the sample app ID shown in the previous example.
**Installation via SPM**
**Key Point:** Mediation adapter libraries are not yet available on Swift Package Manager. If you use [mediation](https://developers.google.com/admob/ios/mediation), we recommend integrating with CocoaPods.
To [add a package dependency](https://developer.apple.com/documentation/xcode/adding-package-dependencies-to-your-app#Add-a-package-dependency) to your project, follow these steps:
1. In Xcode, install the Google Mobile Ads Swift Package by navigating to **File > Add Package Dependencies...**.
2. In the prompt that appears, search for the Google Mobile Ads Swift Package GitHub repository:
```
https://github.com/googleads/swift-package-manager-google-mobile-ads.git
```
3. Select the version of the Google Mobile Ads Swift Package you want to use. For new projects, we recommend using the **Up to Next Major Version**.
### Configuration
**PREREQUISITES**
* An Ad Unit must already be in place which will be used for targeting.
##### **Levelplay UI CONFIGURATION**
**From Levelplay UI (Operational / Configuration Process)**
**Create a** TapMind **waterfall Network**
Please go through the below steps to integrate **TapMind** as a demand partner with your **IRONSOUCE-LEVELPLAY** account. To begin with the integration, login to your **IRONSOUCE-LEVELPLAY** account and follow the below steps.
1. On the Ironsource platform, select Monetize → Setup → SDK Networks.
2. Select Available Networks → Manage Networks. In the dropdown list of available networks, select Custom Adapter**.**
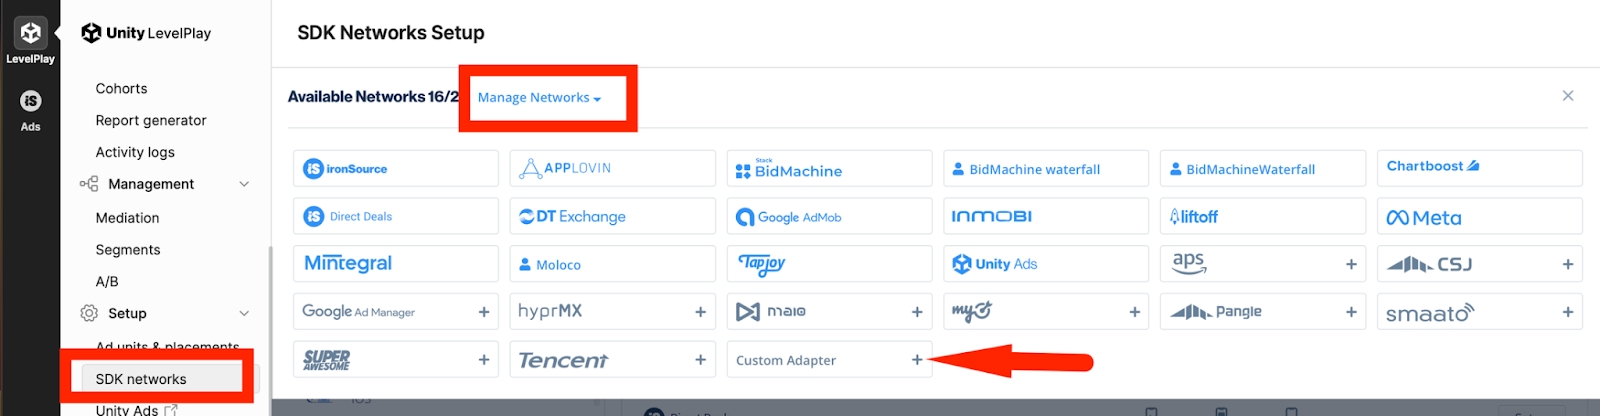
3. To enable the **TapMind Adapter**, input **Network Key** `15c101ba1`, then click on the Enter key, and save. The name of the network should appear as **TapMind**.
4. Click save, your TapMind network is now ready.
**Login LevelPlay → Monetize → Setup → SDK Networks → Available Networks → Manage Networks → Select Custom Adapter → Enter Network Key → Press Enter → Save → TapMind Network Created**
It is highly recommended to enter the Rate (that has been provided by TapMind for each placement id), as this determines the correct order in the waterfalls. Repeat the above setup for each ad-format type. To start with, only add one instance for each format only, and use the discussed eCPM rate for waterfall.
##### Setup Instances
1. In the Left Side Navigation Menu click Instances under Setup.
2. Click TapMind Network listed under Custom.
3. Click on Ad Instance and select Ad type as Per the G-sheet Provided.
For the Below details Please reach out TapMind Account Manger
```
Instance Name : As Per the G-sheet Provided
ecpm : As Per the G-sheet Provided
```
**Setup → Instances → Select TapMind (Custom) → Add Ad Instance → Select Ad Type (from sheet) → Enter Instance Name (from sheet) → Select Mediation Groups → Enter Rate (from sheet)**
#### **Testing instructions**
Before deploying the TapMind SDK and adapter to your live application, you can perform testing with the test mode. This will guarantee a high fill rate (99.99%) during the integration testing process, ensuring that the implementation is functioning correctly. It is crucial to disable the test mode before going live, as failing to do so will result in financial loss.