---
title: AppLovin
description: >-
AppLovin unity guide for Custom Adapter GMA SDK.
---
> **For AI agents:** the complete documentation index is at [llms.txt](/llms.txt). Append `.md` to any page URL for its markdown version.
import DocTagApplovin from '/snippets/doc-tag-applovin.mdx'
**App Prerequisites**
* Ensure **Google Mobile Ads SDK** is already integrated; if not, install it before adding the TapMinds adapter.
## Installation
#### Configuration Steps
**Adding Dependency**
* Open **Unity Editor**.
* Go to **Window → Package Manager**.
* Click the **“+” (Add)** button in the top-left corner.
* Select **Install package from Git URL…**
* Paste the following Git URL and click **Install**:
* ```
https://github.com/tapmind-tech/TapMind-CA-Applovin-Unity.git
```
* Wait for the package to finish installing successfully.
* Once installed, the **TapMind Unity SDK** will be available in your Unity project and ready for integration.
#### Import the Mobile Ads for Unity plugin
1. Download the latest [`.unitypackage`](https://github.com/googleads/googleads-mobile-unity/releases/latest) release from GitHub.
2. Import the `.unitypackage` file by selecting the Unity menu option **Assets > Import package > Custom Package** and importing all items.
#### Set your AdMob app ID
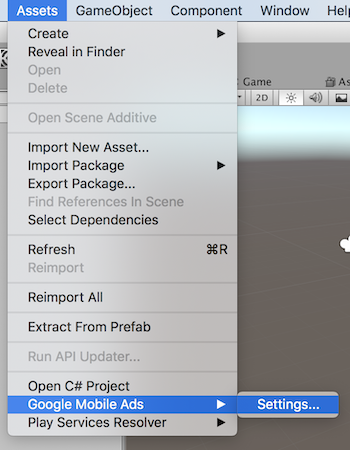
In the Unity editor, select **Assets > Google Mobile Ads > Settings** from the menu.
Enter your Android and iOS [AdMob app ID](https://support.google.com/admob/answer/6232340) in each field.

---
## Configuration
**Platform-specific values**
The steps below apply to **both Android and iOS**. When copying adapter class names or platform-specific parameters, use the **Android** or **iOS** tab for your build target.
**PREREQUISITES**
* An Ad Unit must already be in place which will be used for targeting.
##### **APPLOVIN CONFIGURATION**
Please go through the below steps to integrate **TapMinds** as a demand partner with your **APPLOVIN** account. To begin with the integration, login to your **APPLOVIN** account and follow the below steps.
1. In the MAX Dashboard, select [MAX > Mediation > Manage > Networks](https://dash.applovin.com/o/mediation/networks/).
2. Click on **Click here to add a Custom Network** at the bottom of the page. The Create Custom Network page appears.
```
Custom Network: TapMind Market Place
Android Class: com.tapmind.tech.TapMindMediationAdapterApplovin
```
```
Custom Network: TapMind Market Place
IOS Class: TapMindMediationAdapterApplovin
```
3. Click on **Save**.
**MAX → Mediation → Manage → Networks → Click Add Custom Network → Select Network Type (SDK) → Enter Class Name (Android or iOS) → Save**
**ADDING YIELD PARTNER**
1. Open [MAX > Mediation > Manage > Ad Units](https://dash.applovin.com/o/mediation/ad_units/) in the MAX dashboard.
2. Select the Ad Unit of type(Banner, Interstital or Rewarded) to which you want to add **TapMind** as a custom adapter.
3. Select **TapMind** from the custom network menu to **enable** and enter the information for each placement. Below are the test setup details
Contact your account manager to see what values you need to set for the **final list of production setup (Placement ID**, **Custom Parameters** and **CPM Price)**.
```
App ID = Leave it blank (its optional)
Placement ID = "As Per the G-sheet Provided"
eCPM: As Per the G-sheet Provided
Custom Parameters = {"placementName":"As Per the G-sheet Provided"}
```
4. Click on “Save” and save the configuration.
**MAX → Mediation → Manage Ad Units → Select Ad Unit → Select TapMind → Enter Placement ID → Enter eCPM → Enter Custom Parameters → Save**
The above setup completes our **TapMind x Applovin** integration. You should see an Ad if test setup is complete and working fine.